How to Save Travel Itineraries & Booking Links
Written by LinkVault Team
Picture this: you are standing at an airport check-in counter at 6 AM, the agent asks for your booking reference, and you are frantically scrolling through your email trying to find the confirmation among dozens of promotional messages, travel newsletters, and receipts from other trips. The line behind you grows. Your phone battery is draining. When you finally find the email, the link inside it has expired because the airline redesigned their booking portal last month. This scenario plays out for travelers every single day, and it is not a technology problem — it is an organization problem.
Travel planning involves juggling flight bookings, hotel confirmations, activity links, and itineraries across multiple sites and apps. Each booking generates its own confirmation email, its own reference number, and its own web link. Some links expire after booking. Some require login credentials you no longer remember. Some live in your email inbox, some in a WhatsApp group with travel companions, and some in a browser tab you forgot to bookmark. When you need a specific link during your trip — often with limited connectivity and under time pressure — the absence of a single organized home for all your travel links turns a simple lookup into a stressful scramble.
The solution is a travel vault: one place where every booking link, confirmation number, cancellation policy, and itinerary detail lives together, tagged and searchable, accessible from any device. This guide shows you how to build that vault using LinkVault, step by step, so that the next time you are standing at a check-in counter or arriving at a hotel after midnight, the information you need is one tap away.
What Travelers Need
Before building your travel vault, it helps to understand what a real travel organization system must do. The features below are not nice-to-haves — each one solves a specific failure point that travelers hit on every trip. If you have ever lost a confirmation number, missed a cancellation deadline, or could not find your hotel address while standing on a street corner, the gap was in one of these areas.
- Save all bookings in one place — no more hunting across email, WhatsApp, and browser tabs for a single confirmation link
- Organize by trip and date so your Japan Spring Trip links do not intermingle with your Lisbon weekend links
- Tag by type (flight, hotel, activity, transport) to filter instantly when you need one specific category on the road
- Add confirmation numbers in notes so the reference code is visible without opening the original booking page
- Quick offline access for airports, tunnels, rural areas, and countries where your data plan does not work
- Store cancellation policies and check-in times so you know your deadlines without re-reading a confirmation email
- Share access with travel companions so everyone has the same booking info without forwarding dozens of emails
Step-by-Step: Travel Vault Setup in LinkVault
Building your travel vault takes about ten minutes of setup before your trip, then seconds of maintenance each time you make a new booking. The key is to save links the moment you book — not later, when the confirmation email has already scrolled down your inbox and the details have faded from memory.
- Create a category for each trip by destination and date, such as Japan Spring Trip 2026 or Lisbon Weekend March
- When you book flights, hotels, or activities, copy the confirmation link directly from the booking confirmation page or email
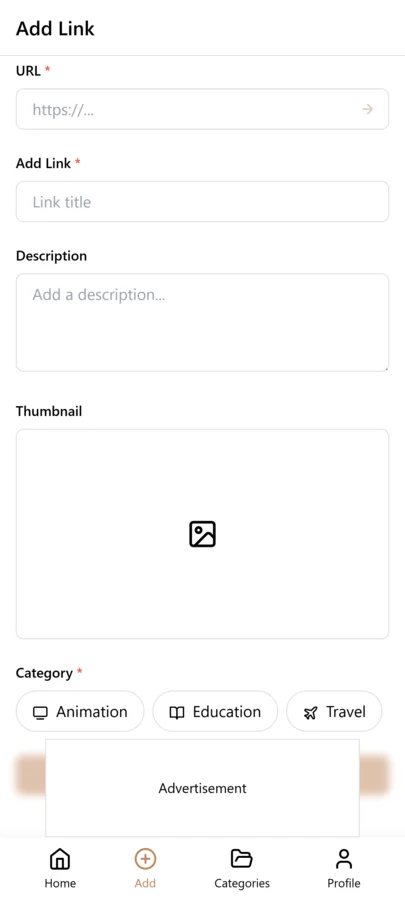
- Open LinkVault and tap the + (Add Link) button
- Paste the booking link into the URL field
- Add notes with all critical details: "Flight BA123 — Confirmation: ABC456 — Check-in opens 24h before — Departs 09:30 Terminal 5" or "Hotel XYZ — Check-in 3PM — Conf: 789012 — Cancellation free until 48h before arrival — Address: 123 Main St"
- Tag by type (flight, hotel, car, activity) so you can filter your vault to show only one category when you need it
- Add a trip-name tag as well, such as japan-2026, so you can pull up every link for this trip in one filtered view
- Save the bookmark — your booking link, notes, and tags are now stored together and synced across all your devices
Tips for Travel Organization
These best practices come from real travel scenarios where a missing detail caused unnecessary stress. Each tip addresses a specific moment — standing at check-in, arriving at a hotel after midnight, trying to cancel within a free window — where having the right information organized in advance saves you time and anxiety.
- Always add confirmation numbers in notes — the single most important detail you will need at check-in, and the hardest to find in a buried email at 6 AM
- Include check-in times and the full hotel address so you can hand the address to a taxi driver without opening your email
- Tag by trip name for easy filtering, such as japan-2026 or lisbon-march, so you can isolate one trip from the rest of your vault instantly
- Save cancellation policies in notes — note the deadline for free cancellation, such as "Free cancel until 48h before — after that one night charged," so you never miss a window
- Add contact numbers for each booking — the hotel front desk, the airline customer service line, and the tour operator number should all be one tap away
- Create an upcoming tag for active trips so you can quickly filter to only the links you need right now, hiding past and future trips from view
- Archive completed trips after you return — move the category into an Archive folder so your active vault stays focused on upcoming and current travel
- Copy critical details into notes even if the link works — airline portals go down, booking sites expire, and you may need the confirmation number when the original page is inaccessible
Handling Multi-Destination and Multi-City Trips
Multi-destination trips — a European tour through five cities, a Southeast Asia loop hitting three countries — add a layer of complexity that a simple category-and-tag system must account for. The mistake most travelers make is creating a separate category for each city, which fragments the trip and makes it hard to see the full itinerary in one view. The better approach is to keep one category for the entire trip and use destination tags to segment within it.
For a two-week trip hitting Tokyo, Kyoto, and Osaka, you would create one category called Japan Spring Trip 2026 and apply destination tags like tokyo, kyoto, and osaka to each booking. When you are in Kyoto and need only your Kyoto hotel and activity links, you filter by the kyoto tag and see exactly what is relevant. When you want the full trip picture, you browse the entire category. Add date tags as well — day-1, day-2, and so on — for bookings tied to specific days, so you can filter to see everything happening on a given date across all cities.
This approach also handles transit between cities cleanly. A Shinkansen booking from Tokyo to Kyoto gets tagged with both tokyo and kyoto, plus a transport tag, because it is relevant in both contexts — you need it when leaving Tokyo and when arriving in Kyoto. Without cross- tagging, transit links often fall through the cracks because they do not belong to just one destination. With it, your travel vault accounts for every leg of a complex itinerary without forcing you to dig through multiple categories.
For round-the-world or extended trips with many legs, consider adding a region tag as well — such as asia or europe — so you can zoom out and see all bookings within a broader geographic area. This layered tagging system — category for the trip, destination tags for cities, date tags for days, region tags for broad areas — scales from a weekend city break to a months-long multi-country journey without breaking down.
Sharing Your Trip Vault with Travel Companions
Traveling with companions means everyone needs access to the same booking information. Without a shared system, you end up forwarding confirmation emails, screenshotting booking details, and fielding questions like "what time is check-in again?" throughout the trip. A shared travel vault eliminates this friction.
If you are traveling with a partner or family, the simplest approach is to share your trip category in LinkVault with read-only access. Everyone can open the category on their phone, see every booking link, read the notes with confirmation numbers and check-in times, and filter by tag — without needing you to forward anything. When a flight gate changes or a hotel booking is updated, you update the note in LinkVault once and everyone sees the latest information instantly.
For group trips with friends or organized travel, the same principle applies but with a slight refinement. Designate one person as the vault keeper — the person who maintains the bookings and updates notes when plans change. Everyone else gets read access. This prevents confusion when multiple people try to update the same booking and create conflicting notes. The vault keeper is the single source of truth, and the rest of the group trusts that the information in LinkVault is current.
The real value shows up in the small moments during a trip. Your travel partner wants to check the hotel address to give to a taxi driver — they open LinkVault, filter by the hotel tag, and the address is in the notes. A friend in the group wants to know what time the walking tour starts — they search the activity tag and find the booking link with the start time in the notes. No one needs to text you and wait for a response. No one needs to dig through their own email. The shared vault turns travel coordination from a constant stream of questions into self-service information retrieval.
Tagging Travel Links by Trip, Destination, and Booking Type
Effective travel organization requires three layers of tagging that work together. Trip-name tags (japan-2026, lisbon-march, london-business-april) group all links for a single trip. Destination tags (tokyo, kyoto, osaka) segment within a trip so you can filter to one city. Booking-type tags (flight, hotel, car, activity, restaurant) let you instantly find one category of booking when you need it urgently.
The power of three-layer tagging shows up in real travel moments. When you arrive at a hotel and the front desk asks for your confirmation number, you filter by the hotel tag and the trip-name tag and immediately see your hotel booking with the confirmation number in the notes. When you need to check your flight status, you filter by flight and the trip-name tag. When you are in Kyoto and want to see your activity bookings for that city, you filter by kyoto and activity. Each filter combination takes you directly to the relevant booking without scrolling through your entire travel vault.
For travelers who take many trips, the trip-name tag also serves as an archival boundary. After a trip ends, you can archive all entries with that trip-name tag in one action, keeping your active vault focused on upcoming and current travel while preserving past trips as reference for future visits to the same destinations.
Pre-Trip and Post-Trip Review Habits
A travel vault is most valuable when it is reviewed at two key moments: before departure and after return. The pre-trip review takes fifteen minutes the day before you leave and ensures you have everything organized for easy access during the trip. The post-trip review takes ten minutes after you return and ensures your vault stays clean and useful for future travel.
For the pre-trip review, filter by your trip-name tag and scan every booking. Check that each entry has the confirmation number, check-in time, and address in the notes. Verify that every booking has the correct booking-type tag so you can filter quickly during the trip. Add an upcoming tag to all entries so you can filter to just this trip when you are traveling. If you have multi-city bookings, verify the destination tags are correct for each city. This review ensures that when you are standing at a check-in counter with limited connectivity, every detail you need is one tap away.
For the post-trip review, filter by the trip-name tag and add a completed tag to all entries. Note any restaurants, activities, or places worth revisiting in a future trip — add a wishlist tag to these so they surface when you plan a return visit. Remove the upcoming tag since the trip is over. Archive the trip category so your active vault focuses on future travel. This post-trip review turns each completed trip into reference material that improves your future travel planning.
Handling Travel Changes and Cancellations
Travel plans change — flights get delayed, hotels get overbooked, activities get cancelled by the operator. When a booking changes, your LinkVault vault needs to be updated to reflect the new reality, otherwise you will find yourself relying on outdated information during your trip.
When a booking changes, update the LinkVault entry immediately with the new details. If a flight time changes, update the notes with the new departure time and gate information, and add a note about the original time for reference. If a hotel booking is cancelled and you book a replacement, update the existing entry with the new hotel details and confirmation number rather than creating a separate entry, so you do not accidentally reference the old cancelled booking.
For cancellation policies, note the deadline and terms in your notes at the time of booking. "Free cancellation until 48 hours before check-in — after that, first night charged" tells you exactly when you need to decide. Set a reminder in your calendar for the cancellation deadline so you do not miss the window. If you do cancel, update the LinkVault entry to note the cancellation and any refund details, so you have a record of the cancellation for your expenses or reimbursement.
Common Travel Link Saving Mistakes
- Saving only the confirmation email instead of the booking site link — email links expire and email gets buried, so always save the booking site URL with the confirmation details copied into your notes
- No trip-name tag — without a trip-name tag, bookings from different trips intermingle and you cannot filter to just the trip you are currently on, so always tag with a trip identifier like japan-2026
- No dates in notes — when you have multiple hotel bookings for different nights, not including the check-in and check-out dates in your notes makes it unclear which booking is for which night
- Keeping expired bookings after a trip — completed and expired bookings clutter your active vault, so archive them after each trip to keep your upcoming travel easily findable
- Not saving offline copies of critical confirmations — airline portals go down and connectivity is unreliable while traveling, so copy confirmation numbers and key details into your notes where they are accessible offline
Building a Travel Reference Archive from Past Trips
Your completed trips are not just memories — they are reference material that improves your future travel planning. When you archive a trip, the restaurants, activities, and hotels you enjoyed become a curated guide for future visits to the same destination. Instead of starting from scratch each time you visit a city, you filter by the destination tag and see every place you have already been with your own reviews.
The practice is to enrich your entries during the post-trip review. For restaurants you enjoyed, add notes about what dishes were great and whether you would return. For activities, note whether they were worth the time and money. For hotels, note the location, room quality, and whether you would stay there again. Tag these with a wishlist or return-visit tag so they surface when you plan a future trip to the same city.
Over time, your travel archive becomes a personal guidebook built from your own experiences. When you plan a return trip to London, you filter by london and see every restaurant, hotel, and activity you saved from previous visits, each with your personal review. This is more trustworthy than TripAdvisor reviews because it reflects your own taste and experience, and it is instantly accessible without re-researching from scratch.
Frequently Asked Questions
Can I access bookings offline?
Yes. LinkVault works offline. Save all links and notes before your trip for offline access.
How do I organize multi-destination trips?
Use one category for the entire trip and tag each booking by destination or date. For example, a Japan trip hitting Tokyo, Kyoto, and Osaka stays in one category, with tokyo, kyoto, and osaka tags on individual bookings so you can filter by city when you are there.
Should I save email confirmations or booking site links?
Save both if possible. Note confirmation details in the notes field for quick reference. The booking site link lets you manage your reservation online, while the email link serves as a backup if the booking portal is down or has expired.
What do I do when a booking link expires or stops working?
If a booking link expires, your LinkVault notes still contain the critical information — confirmation numbers, check-in times, and booking details — so you can call the airline or hotel directly with your reference. Update the note to mark the link as expired so you do not waste time clicking it again. For important bookings, save the confirmation email content as text in the notes field as a backup in case the original page becomes inaccessible.
How do I handle group bookings with multiple confirmation numbers?
Save one LinkVault entry for the group booking and list all confirmation numbers in the notes field, separated clearly — for example, "Group booking — Conf A: ABC123 (John), Conf B: DEF456 (Sarah), Conf C: GHI789 (Mike)." Tag it with the trip name and a group tag. If individual travelers need their own reference, they can search the notes field for their name to find their confirmation number.
Can I use LinkVault for recurring business travel?
Yes. Create a category called Business Travel and tag each trip by destination and date, such as nyc-march-2026 or london-april-2026. Use a recurring tag for trips to the same city so you can see all your past bookings for that destination in one view. This helps you reuse hotel preferences, find reliable airport transfer links, and rebuild an itinerary quickly for a city you visit regularly.
How do I organize travel links for international trips with multiple languages and currencies?
Tag by country and currency so you can filter to all bookings within one country. Note the language of the booking site in your notes — "booking site in Japanese, English version available at en.example.com" — so you know which URL to use. Save the English-version URL when available, and note the currency and price in your notes along with the approximate conversion to your home currency, so you can compare costs across countries without doing mental math while traveling.